
Upgrade Your Treadmill: Replace Your Belt and Experience a Whole New Level of Fitness!
A worn-out treadbelt can cause several issues with your treadmill, including inconsistent speed, sluggish feel, sudden stops, motor controller failure, and other safety hazards. To check if your belt is worn, you can perform the following tests:
Walk on your treadmill as normal at about 3mph. Then walk on the belt towards the edge of the belt. If the belt seem to speed up when walking on the edge of the treadbelt your belt is possibly worn.
With your palm up, feel under the belt towards the center. Take note of how the center of the belt feel. Now move your hand towards the edge of the belt and notice if there is a difference in the texture. If there is a difference in the texture your treadmill belt is worn.
To check the deck, perform the same procedure as in step 2, but with your palm down. If you feel groves (or what feels like scratches) in your deck, your deck is worn. It is recommended to replace the deck when replacing the treadbelt.
Walk on your treadmill for up to 30 minutes. If your treadmill suddenly loses power or stops before the 30 minutes, your belt and deck may be worn.
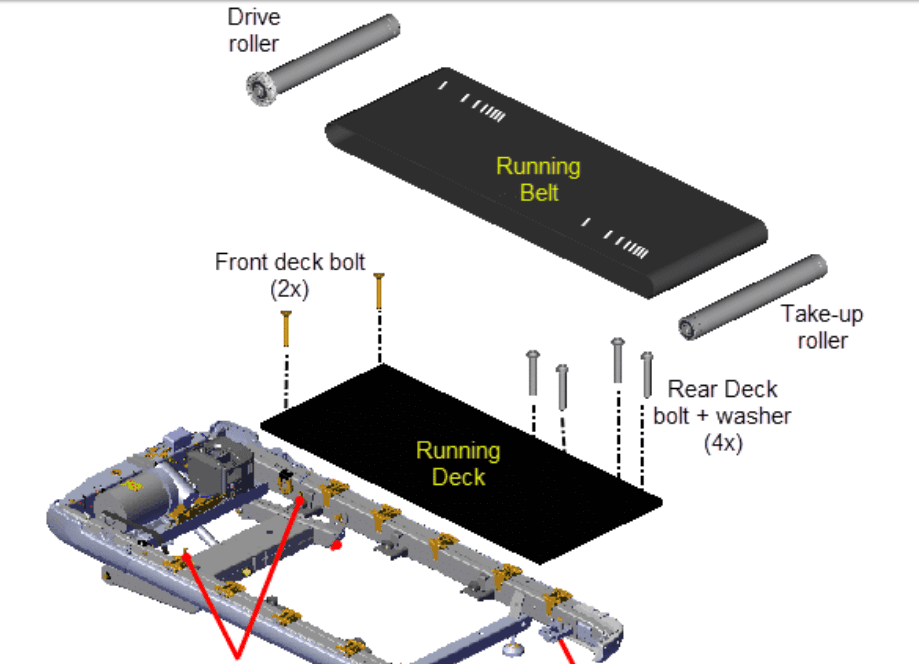
If you notice any of the above signs of wear or damage, it's important to replace your belt as soon as possible, as continued use can cause additional problems. In this article, we'll provide you with step-by-step instructions on how to replace the treadbelt on your treadmill. Below is a diagram of the layout of the treadbelt and deck area.
Step 1: Gather the Necessary Tools and Materials
Before you begin, you'll need to gather some tools and materials to complete the job. Here's a list of what you'll need:
Replacement treadbelt
Phillips Screwdriver
Allen wrench (different treadmill uses different sizes)
Socket wrench
Lubricant spray
Clean cloth
Step 2: Disconnect the Power
To avoid any potential accidents or injuries, it's important to disconnect the power to your treadmill before you begin working on it. Unplug the power cord from the wall socket or turn off the circuit breaker that powers the treadmill.
Step 3: Remove the Front and Rear Rollers
The next step is to remove the front and rear rollers from your treadmill. You'll need to use your tools to remove any bolts or screws that are holding the rollers in place. Use the allen wrench to remove the bolts on the rear and front roller. Once you've removed the bolts, slide the rollers out and set them aside.
Step 4: Remove the Old Treadbelt
Now that you've removed the rollers, you'll need to remove the old tread-belt from your treadmill. Start by removing any bolts or screws holding the right side rail in place. Some screws are inserted from the bottom of the deck on some treadmills, and some are hidden under the end-caps etc. Be sure to remove all screws. Do not force the side-rail off. Check to see if there are additional screws holding it in place. Many side rails will slide off towards the back. There is no need to remove the left side rail. Now remove the screws holding the deck in place on the right side only. Next, lift the deck and prop it up by sticking thr head of a screw driver between the deck and frame. Now slide the old treadbelt off the deck of the treadmill and set it aside.
Note: Most treadmills have belt guides mounted to the underside of the deck in the front. You will need to guide the tread-belt over the belt guides to facilitate an easier removal.
Step 5: Clean the Deck
Before installing the new treadbelt, it's important to clean the deck of your treadmill to ensure that it's free of any debris or dirt. Use a clean cloth to wipe down the deck, making sure to remove any dirt or debris that could cause damage to the new treadbelt.
Step 6: Install the New Treadbelt
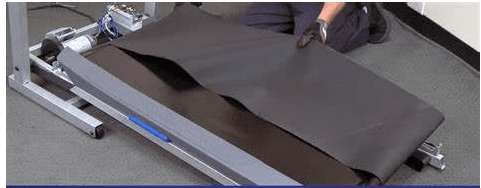 Now it's time to install the new treadbelt onto the deck of your treadmill. Begin by aligning the treadbelt with the center of the deck. Then, starting at the front of the treadmill, slowly slide the belt onto the deck. Be sure to guide the belt over the belt guides. Now secure the deck with the deck screws.
Step 7: Reinstall the Rollers
Reinstall the front roller by sliding the roller under the belt and position in place. Make sure the drive belt is positioned around the roller (no need to be concerned about the securing the drive belt to the drive motor at this time), then secure the front roller with the screws removed earlier. securing it with the screws removed earlier. Now slide the rear roller under the belt and secure with the adjustment screws removed earlier.
Step 8: Install the Drive Belt
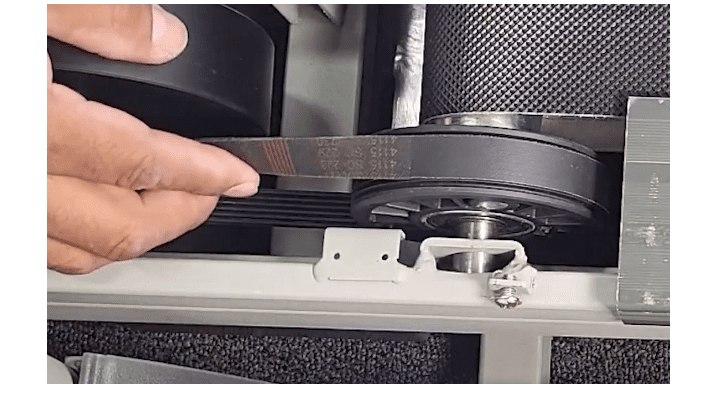 With the drive belt already around the front roller, you will now need to install it onto the drive motor pulley. With the drive belt around the shaft of the roller, drape the drive belt around the drive motor pulley, then slowly force the drive belt onto the front roller pulley.
Step 9: Lubricate the Treadbelt
Now we’re going to lubricate the treadbelt before tensioning as it is a lot easier. Using a 2oz bottle of silicone treadmill lubricant, apply liberally to the center area of the deck until the bottle is empty. Now massage the lubricant into the belt using your foot on the surface of the belt.
Step 10: Adjust the Tension of the Treadbelt
To ensure that the new treadbelt is properly tensioned, you'll need to make some adjustments. Use your Allen wrench or socket wrench (depending on your treadmill) to adjust the tension bolts located on the rear roller. Make sure that the tension is set evenly on both sides of the treadbelt. See how to tension your treadmill belt article. Tension the belt to the point where you can lift the belt about 3 to 3 inches. Next plug the treadmill in and walk on the belt to make sure its centered. Check if belt is slipping. If belt slips, tension another ½ turn on both sides. Continue tensioning a ½ turn on both sides until slipping stops.
Step 11: Install the Left Side Rail and Test
Slide the left side rail on and secure with screws removed earlier. Install the rear end caps. Once you've completed all of the steps, it's time to test your treadmill to ensure that everything is working properly. Turn on the treadmill to test the new treadbelt. Listen for any unusual noises or vibrations, and make sure that the treadbelt is centered and treadmill is running smoothly.
In conclusion, replacing the treadbelt on your treadmill can seem like a daunting task, but it's actually a series of simple steps. To be successful you must trust and follow the process. We wish you success in your treadbelt replacement endeavor. Check out the supporting articles listed below.


